

Fancy making some Halloween decorations with the children? This free printable Halloween wreath is a lovely way to spend a crafty autumn afternoon. Just print, colour, cut and stick to create a wreath filled with cheeky pumpkins, fluttering bats and colourful autumn leaves.
There’s no need for a trip to the craft shop, either. Grab your colouring pencils, scissors and glue, and you’re ready to get started.
I love crafts that give children room to make their own choices. They can fill their wreath with friendly pumpkins, add a ghost or two, or squeeze in as many spooky decorations as they like. Even when everyone starts with the same printable, each finished wreath will look different!
What’s included in the free Halloween wreath printable?
The seven-page printable includes:
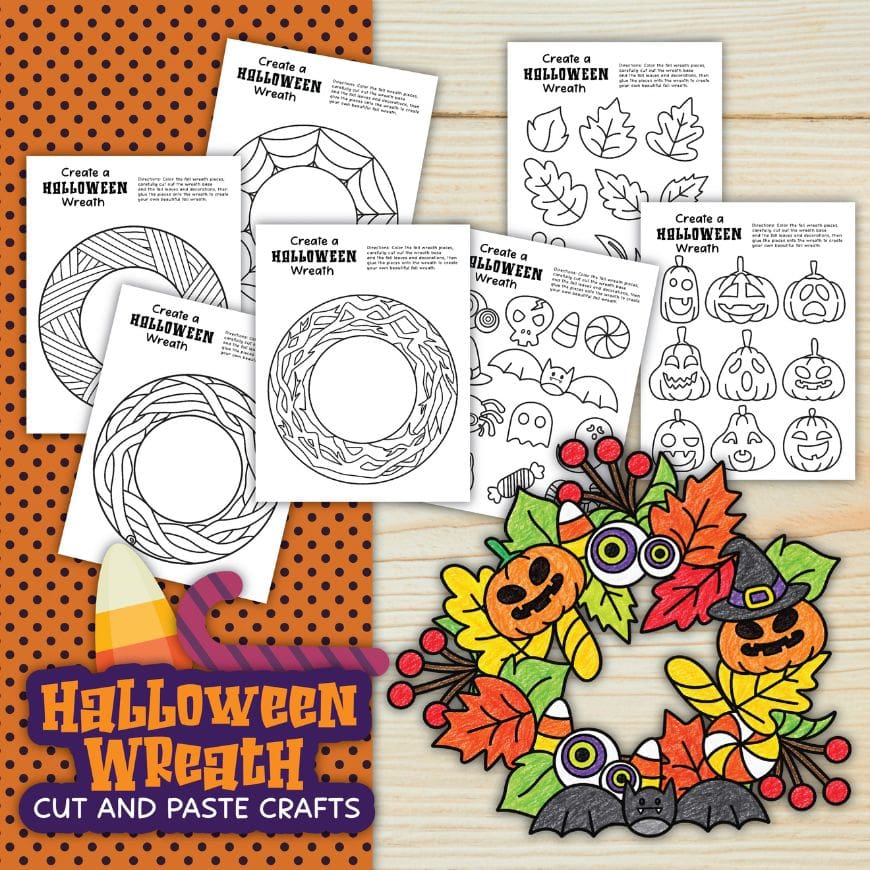
- Four wreath bases, with spiderweb, woven and twisting branch designs.
- Nine pumpkins, each with a different expression.
- A sheet of Halloween decorations, including a bat, ghosts, a spider, a skull, a cat, a witch’s hat and sweets.
- A sheet of autumn decorations, including leaves, berries and feathers.
Everything comes in black and white, ready for children to colour. Choose one wreath base and print the decoration sheets you want to use; there’s no need to print all four bases for each child.
What you need
- The free Halloween wreath printable
- White paper or lightweight card suitable for your printer
- Colouring pencils, crayons or felt-tip pens
- Scissors
- A glue stick
- Ribbon or string for hanging, if you wish
Tip: If you’re printing on ordinary paper, glue the wreath base onto a piece of recycled card before cutting it out. A cereal box works well and helps the finished wreath hold its shape.
How to make your cut and colour Halloween wreath
1. Choose your wreath base
Pick your favourite design. The spiderweb base is a fun choice for a spooky wreath, while the branch designs look lovely with autumn leaves and pumpkins.
Print your chosen base along with the decoration pages you’d like to use.

2. Colour the pieces
Colour the wreath and decorations before cutting them out. It’s much easier to colour small pieces while they’re still on the sheet!
Try orange pumpkins, purple ghosts and bright green leaves, or use reds, yellows and browns for an autumnal wreath. There’s no right colour scheme here. If your child wants a pink pumpkin and a rainbow bat, let them go for it.
3. Cut out the wreath and decorations
Cut around the outside of the wreath, then remove the centre to make a ring. Cut out your chosen pumpkins, leaves and Halloween shapes.
Younger children may need help with the centre of the wreath and the more detailed pieces. An adult can make the starting hole in the middle so children can cut towards the inner outline.
4. Arrange your decorations
Before reaching for the glue, lay the pieces around the wreath.
You could start with a layer of leaves, then add pumpkins and spooky characters on top. Let some pieces overlap or poke out over the edges for a fuller wreath.
Encourage children to move things around until they’re happy with their design. They don’t have to use every piece.

5. Glue everything in place
Lift each decoration, add glue to the back and press it onto the wreath. Make sure overlapping pieces are attached securely, then leave the wreath flat while the glue dries.
6. Hang up your Halloween wreath
Tape a loop of ribbon or string to the back and hang your finished wreath on an indoor door or wall.
It’s a cheerful way to decorate a bedroom door, brighten up a Halloween party or add something handmade to your autumn display.
Easy ways to make this craft your own
Make a pumpkin wreath: Choose your favourite pumpkin faces and arrange them among orange, yellow and red leaves.
Go a little spookier: Add ghosts, a spider and a bat to the spiderweb base. Purple, black and green make a great Halloween colour combination.
Keep it autumnal: Use the leaves and berries with one of the branch bases for a decoration you can enjoy throughout autumn.
Make it together: Let younger children do the colouring and choose where the pieces go while an adult helps with cutting. Older children can take on the whole project and experiment with patterns and layers.

A little learning while they craft
This activity gives children a chance to practise colouring, cutting and glueing, as well as deciding how to arrange their decorations.
There’s plenty to chat about as you work, too. Which pumpkin looks surprised? How many ghosts will fit around the wreath? Can they make a repeating pattern with the leaves?
Keep it relaxed, though. The fun is in creating something of their own, whether that means carefully coloured leaves or a wonderfully crowded wreath of Halloween characters.
Download your free printable Halloween wreath
Ready to get crafting? Download the free Halloween wreath printable, choose your favourite base and enjoy an afternoon of colouring, cutting and sticking.
I’d love to hear which decorations your children choose. Will it be a wreath full of grinning pumpkins, friendly ghosts or colourful autumn leaves?