

Paper flowers are a classic children’s craft for a reason. They’re colourful, flexible, low-cost, and endlessly adaptable for different ages and abilities. Whether you’re crafting at the kitchen table with preschoolers, planning a calm afternoon activity, or looking for a creative classroom project, paper flowers are a brilliant go-to.
In this children’s craft showcase, we’re sharing several easy ways to make paper flowers with children, including a simple, no-glue method using heart-shaped paper punches and split pins, which is especially suited to younger children. Along the way, we’ll explore materials, learning benefits, seasonal ideas, and ways to turn paper flowers into meaningful keepsakes.
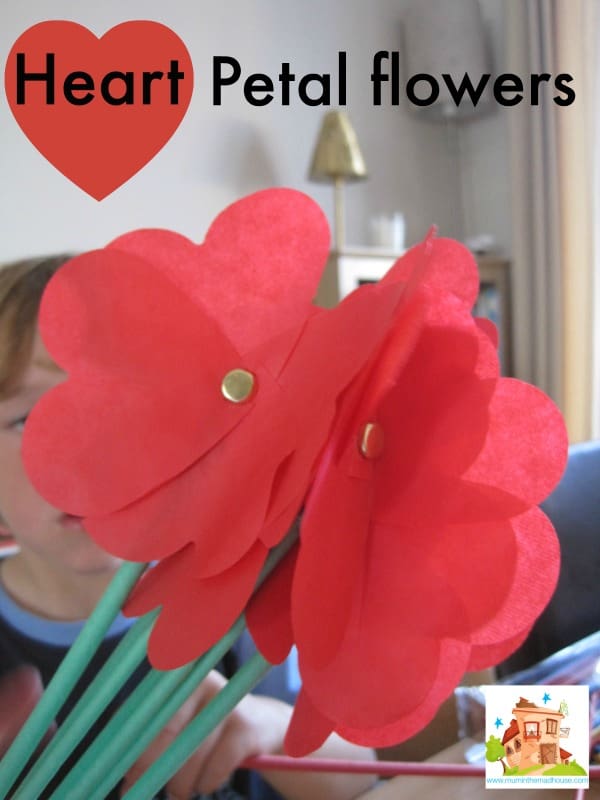
These heart flowers don’t wilt, don’t need watering, and don’t mind being a bit wonky — which makes them perfect for little hands and big imaginations.

Why Paper Flowers Are Such a Great Craft for Kids
Paper flowers work so well with children because they strike the perfect balance between structure and freedom.
They are:
- Low-cost – using basic supplies you likely already have
- Low-pressure – there’s no “right” result
- Adaptable – suitable for toddlers through to older children
- Skill-building – supporting cutting, fastening, and fine motor control
- Creative – encouraging personal choices and experimentation
They can be quick and simple or more detailed and layered, depending on how much time and focus you have.
Materials You’ll Need
You can keep this craft very simple or offer a wider range of materials for children to explore.
Basic Supplies
- Coloured paper or cardstock
- Scissors (child-safe where appropriate)
- Glue sticks or PVA glue
- Pencil
Optional Extras
- Tissue paper or crepe paper
- Paper straws or wooden sticks (for stems)
- Buttons, sequins, or paper circles for centres
- Markers or crayons
- Heart-shaped paper punch
- Split pins (paper fasteners)
For younger children, thicker paper is easier to handle, while older children may enjoy experimenting with thinner or textured papers.

A Simple Paper Flower Method (Great for All Ages)
This is a classic approach that works well for mixed-age groups.
Step 1: Create the Petals
Ask children to draw petal shapes onto coloured paper and cut them out. These can be oval, teardrop-shaped, or abstract — perfection isn’t the goal here. We used a punch to make heart shaped flowers.
Step 2: Add Shape
Curl the edges of the petals around a pencil or gently fold the base to give them dimension.
Step 3: Assemble the Flower
Glue the petals in a circular arrangement, overlapping slightly. Layer smaller petals on top for depth.
Step 4: Add a Centre
Finish with a circle of paper, a button, or a scrunched piece of tissue paper.
Step 5: Optional Stem
Attach to a rolled paper stem, straw, or stick using tape or glue.

A No-Glue Flower Method for Younger Children
(Using a Heart-Shaped Paper Punch and Split Pins)
For younger children, preschoolers, or early years settings, a heart-shaped paper punch paired with split pins offers a wonderfully accessible and low-mess alternative.
This method removes the need for cutting and glueing while still allowing children to assemble and personalise their flowers.
How It Works
- Use a heart-shaped paper punch to pre-cut several hearts from coloured paper.
- Turn the hearts so the pointed ends meet in the centre — these naturally form soft, rounded petals.
- Carefully pierce a hole in the centre (or pre-punch one).
- Secure the hearts together using a split pin (paper fastener).
Children can then:
- Rotate the petals to change the look of the flower
- Add or remove petals easily
- Explore symmetry and pattern through play
The finished flower can be taped onto card, attached to a paper straw for a stem, or used as a decoration.
Why This Method Works So Well
- No glue = less mess
- Supports fine motor development
- Allows repositioning and experimentation
- Ideal for children who struggle with scissors
This approach is particularly popular in nurseries and classrooms and still produces flowers that children are genuinely proud of.

Tissue Paper Flowers for Big Impact
Tissue paper flowers are another child-friendly option and work especially well for group crafting.
Quick Method
- Stack 4–8 sheets of tissue paper
- Fold accordion-style
- Secure in the middle with a string or a pipe cleaner or with a paper brad/clip whoch pushes straght in to the straw.
- Round or point the ends
- Gently separate the layers
Children love the dramatic moment when the flower opens, making this a satisfying and engaging craft.
Learning Benefits of Making Paper Flowers
Paper flower crafts offer more than just a finished product.
Fine Motor Skills
- Cutting and punching
- Folding and fastening
- Hand strength and coordination
Creativity and Expression
- Colour and shape choices
- Individual designs
- Confidence in decision-making
Emotional and Social Benefits
- Calming, mindful activity
- Opportunity for conversation
- Shared creative experience
You can also link paper flowers to learning themes such as nature, seasons, or celebrations.

Seasonal and Celebration Ideas
Paper flowers adapt beautifully to different times of year.
- Spring: daffodils, blossoms, pastel blooms
- Summer: bright wildflowers and sunflowers
- Autumn: warm-toned flowers with layered petals
- Winter: white or metallic flowers with simple shapes
They’re also perfect for celebrations like birthdays, Mother’s Day, Valentine’s Day, and weddings. Some families enjoy creating decorative flowers inspired by symbolic designs such as heart flowers, which can open up gentle conversations about shape, colour, and meaning in art.
Displaying Children’s Paper Flowers
Once finished, children love seeing their creations displayed.
Ideas include:
- Paper flower bouquets in jars
- Wall displays or garlands
- Seasonal craft boards
- Handmade cards or gift toppers
Photographing the flowers and creating a digital scrapbook is another lovely way to preserve children’s work.
Using Recycled Paper
Paper flowers are ideal for eco-friendly crafting.
Try using:
- Old magazines
- Wrapping paper scraps
- Newspaper
- Damaged book pages
Recycled materials add texture and often spark storytelling as children notice words and images in their petals.
Tips for Stress-Free Crafting with Kids
- Prepare materials ahead of time
- Cover surfaces
- Accept mess and imperfection
- Craft alongside children rather than directing
- Focus on the process, not the finished look
The joy is in the making.
Extending the Activity
If children want to keep going, you can:
- Create a paper flower garden
- Write poems or stories about their flowers
- Sort flowers by colour or size
- Combine flowers into a larger collaborative display
These extensions are especially useful for home learning or classroom projects.
Why Paper Flowers Are a Timeless Children’s Craft
Paper flowers remain popular because they’re simple, inclusive, and endlessly creative. With just paper and a few basic tools, children can create something expressive and meaningful — whether they’re carefully fastening petals with a split pin or joyfully unfolding a tissue paper bloom.
They’re a reminder that creativity doesn’t need to be complicated. Sometimes, the simplest materials create the most memorable moments.
If you like these, then check out our other DIY Flower posts
What a lovely and inspiring post I love how practical and fun your ideas are I’ve also shared some creative family activity ideas on my blog that others might enjoy too.