Print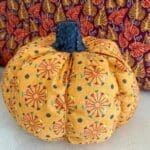
How to Make Fabric Pumpkins
Ingredients
- Fabric - Grab a pumpkin trio pack direct from Sugar Bowl Crafts with fabric, felt, stuffing and thead to make three pumpkins
- Felt
- Stuffing
Instructions
- Fold the fabric in half - with right sides together (this means you should be looking at the ‘inside’ of the pumpkin). Sew together using a half-inch seam allowance.
- Sew the bottom of the pumpkin. Knot one end of your thread and sew a running stitch across the bottom 1” away from the edge. Then pull tight to gather the end. Knott again and turn inside out. If there is a hole still visible you can go back and stitch it closed.
- Add your stuffing. This can be toy stuffing or scraps of fabric .
- For smaller pumpkins, add another running stitch to the top of the pumpkin an inch away from the selvedge (the edge of the fabric).
- Then pull the gathers leaving the raw edges visible at the top of the pumpkin. This forms the base of the stalk. When the hole is closed, tightly knot your thread and remove loose ends.
- For larger pumpkins, take a piece of felt (6cm x 20cm) and roll tightly to form a stiff ‘stick’, glue so that it doesn’t unravel (you can always use glue to stop it unravelling). Place the felt stick into the top hole, push the raw edges of the pumpkin fabric into the pumpkin so that they are hidden and pull the gathers around the stick to secure it and close the gap.
- Knot securely. This forms the structure of the stalk. There shouldn’t be any raw edge or knots visible.
- Squish the pumpkin into the desired shape. Then knot the embroidery thread by the stalk and follow a natural gather in the fabric to the base.
- Pull the thread in through the hole at the bottom and come up in the next place you want the crease to form. Then take the thread back up to the stalk and knot again at the stalk. Carry out this process 6 times.
- Cut out a minimum 6 triangles from felt that will form the stalk. Pinking shears will create a more organic look but straight edges work fine too. Cut the triangles very roughly 1 inch tall, but you can create much bigger stalks if you like them. Now glue the triangles into place. The base of the triangle should cover the base of your fabric stalk, hiding the join of fabric to the stalk. Add as many triangles as you need to cover the fabric stalk and make sure the points of the triangles meet.